


Source code
Source code of the final application with all the functionality described in this article can be found on Github.
New project
The easiest way to set up Spring AI is to create a new application using Spring Initializr. This way, you'll avoid a couple of manual configuration steps and the creation will be much faster. If you need to update an existing application with AI capabilities, you can skip to the Existing project section below.
IntelliJ Idea
This section describes creating a new project in IntelliJ IDEA. If you are using different IDE, you can continue directly to Spring Initializr Web
Idea has built-in integration with Spring Initializr. You can simply go to:
File → New → Project → Spring BootIn the first section, fill in your desired settings as usual. Nothing is AI-specific here.
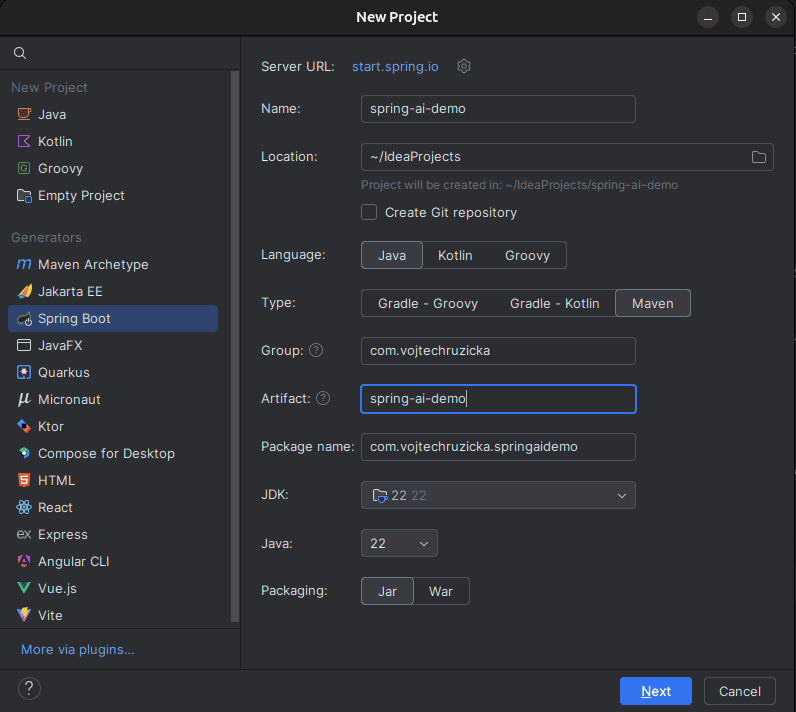
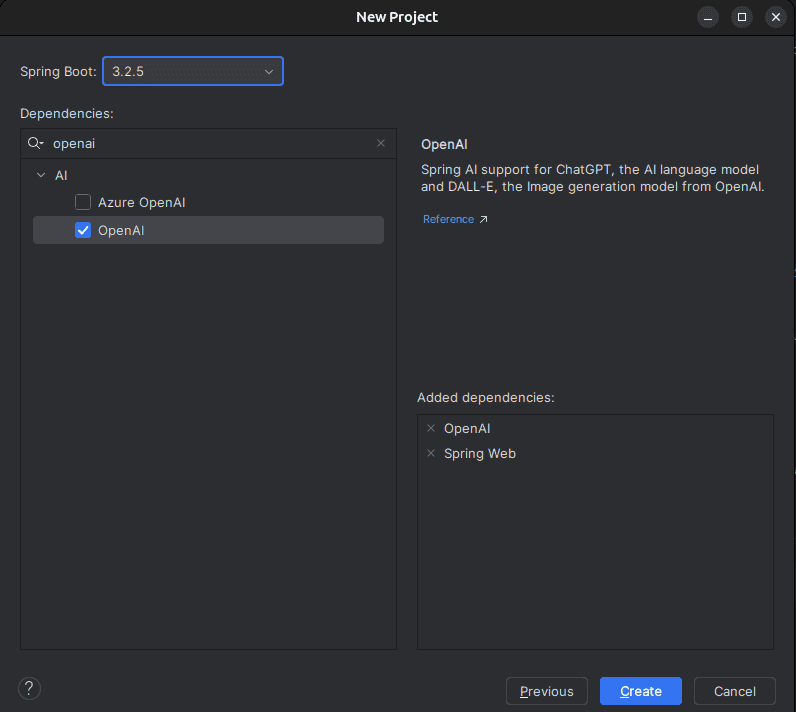
In the second section, let's add dependency to OpenAI. That's all that's needed, but let's also add Spring Web so we can expose our AI functionality as REST endpoints.
Our project is now generated, you can skip to API Key section below.
Spring Initializr Web
Creating a project from IntelliJ IDEA is the simplest approach, but if you have a different IDE, which does not integrate Spring Initializr, you can generate the project from the web. It is very similar to generating from IDE, but you'll need to do a couple of extra steps - download and extract the generated project and then import it to your IDE.
Fill in whatever configuration you prefer (such as Java version or build tool) and add a dependency on OpenAI. While not required, let's also add Spring Web so we can easily expose our new AI functionality as REST endpoints.

Our project is now generated, you can skip to API Key section below.
Existing project
Updating an existing project is a bit more tricky at the moment before the final version is released. This is mostly because the artifact has not yet been released to the regular Spring repository, so you need to set up an alternative repository for pre-release artifacts manually.
Repository setup
You can choose from two available repositories:
- Snapshot repository: Most up-to-date version available, which will contain the newest features but may be more unstable.
- Milestone repository: Released milestone versions are more stable, and that's what we will use in this article
For Maven, update your pom.xml with the following:
<repositories>
    <repository>
      <id>spring-milestones</id>
      <name>Spring Milestones</name>
      <url>https://repo.spring.io/milestone</url>
      <snapshots>
        <enabled>false</enabled>
      </snapshots>
    </repository>
</repositories>
For Gradle, use the following:
repositories {
  mavenCentral()
  maven { url 'https://repo.spring.io/milestone' }
}
Dependency Management
While you can add your dependencies with a version directly specified, it is usually not the preferred way in Spring Boot applications. Typically, you don't specify any versions directly except for the parent pom, which defines all the versions of individual dependencies. When you add a new dependency, you don't need to worry about specifying the version as it is then inherited from the parent pom. This has the advantage that you don't need to worry about determining the exact version of your components, and your dependencies will work well together.
In the final release of Spring AI, all the dependency versions will be most likely specified as usually in the parent pom, but until then, you can import Spring AI BOM, which will achieve the same.
For Maven add this to you pom file:
<dependencyManagement>
    <dependencies>
        <dependency>
            <groupId>org.springframework.ai</groupId>
            <artifactId>spring-ai-bom</artifactId>
            <version>0.8.1</version>
            <type>pom</type>
            <scope>import</scope>
        </dependency>
    </dependencies>
</dependencyManagement>
Or if using Gradle:
dependencies {
  implementation platform("org.springframework.ai:spring-ai-bom:0.8.1")
}
Adding dependencies
Now it's time to add dependency on Spring AI and a specific AI platform. Let's use OpenAI for now.
For Maven, add the following dependency to your pom.xml file in the <dependencies> section:
<dependency>
    <groupId>org.springframework.ai</groupId>
    <artifactId>spring-ai-openai-spring-boot-starter</artifactId>
</dependency>
Or, if you are using Gradle:
dependencies {
    implementation 'org.springframework.ai:spring-ai-openai-spring-boot-starter'
}
Note that we didn't have to specify the version as it is taken from the spring AI BOM, which we configured earlier.
API Key
Now that we have all the required dependencies in place, we need to configure the connection to the OpenAI API. The good news is that the only configuration parameter we need to provide is the API key, which will be used for authentication with the API.
To obtain the API Key, we first need to create an OpenAI account. After that, go to API Keys page and generate a new key. After the key is created, copy it, so we can use it later. You may also need to purchase some credit to your OpenAI account otherwise you may get quota exceeded exceptions.
Now, we need to provide our application with the new API Key so it can connect to the OpenAI platform. The easiest way is to put it in your application.properties (or application.yml).
spring.ai.openai.api-key=<YOUR_API_KEY>SPRING_AI_OPENAI_API_KEY with your API key or pass the spring.ai.openai.api-key as command line param when launching the application.Text generation
Simple queries
Basic prompt-based text generation is quite simple. We need to inject ChatClient as a dependency to a class where we want to use that and the call chatClient.call(prompt) method passing in String query. As a result, we will receive a generated response.
@Service
public class ChatService {

    private final ChatClient chatClient;

    public ChatService(ChatClient chatClient) {
        this.chatClient = chatClient;
    }

    public String queryAi(String prompt) {
        return chatClient.call(prompt);
    }

}
Now we can call our service wherever needed. For example, we can expose new REST endpoint via a new Controller:
@RestController
public class AiController {

    private final ChatService chatService;

    public AiController(ChatService chatService) {
        this.chatService = chatService;
    }

    @GetMapping("ask-ai")
    public String askAi(@RequestParam("prompt") String prompt){
        return chatService.queryAi(prompt);
    }

}
Now we can start our application and test in the browser by calling http://localhost:8080/ask-ai?prompt=how%20are%20you.
Template queries
In the example above, we let our application or external users to define the whole prompt. Sometimes it's exactly what we need, however sometimes we would like to have more control over our queries. Let's say we would like to have predefined queries over which we have full control and only provide certain parameters to adjust the queries.
Let's imagine our application provides useful tips on what to do on vacation. The user only provides us with the city and their interests, and we generate tips on what to do in the city.
Instead of the user providing the whole prompt, we can prepare a template such as:
I am a tourist visiting the city of {city}.
I am mostly interested in {interest}.
Tell me tips on what to do there.
And then only fill in user-provided details instead of the placeholders. In Spring AI we can do this with PromptTemplate. Let's update our ChatService.
public String getCityGuide(String city, String interest) {
    var template = """
            I am a tourist visiting the city of {city}.
            I am mostly interested in {interest}.
            Tell me tips on what to do there.""";

    PromptTemplate promptTemplate = new PromptTemplate(template);

    Map<String, Object> params = Map.of("city", city, "interest", interest);
    Prompt prompt = promptTemplate.create(params);

    return chatClient.call(prompt).getResult().getOutput().getContent();
}
To expose our new functionality, we can update our Controller:
@GetMapping("city-guide")
public String cityGuide(@RequestParam("city") String city,
                        @RequestParam("interest") String interest) {
    return chatService.getCityGuide(city, interest);
}
Image generation
Generating images
For image generation, we can inject ImageClient through dependency injection wherever needed and utilize it to generate our images. Let's create a new service that will automatically receive ImageClient through constructor injection.
@Service
public class ImageService {

    private final ImageClient imageClient;

    public ImageService(ImageClient imageClient) {
        this.imageClient = imageClient;
    }
}
Now we can create a method, which will generate images based on text prompt:
  public ImageResponse generateImage(String prompt) {
      ImageOptions imageOptions = ImageOptionsBuilder.builder()
              .withN(1)  //Number of images to be generated
              .withHeight(1024)
              .withWidth(1024)
              .build();

      return imageClient.call(new ImagePrompt(prompt, imageOptions));
    }
Note that in addition to text prompt, which specifies what should our image be about (such as 'Bunch of cute cats playing on sofa.') we also need to provide ImageOptions object, which we generated with a provided builder. Image options specify additional parameters for generation such as dimensions, number of images to be generated, format etc.
In the example above, we used generic ImageOptions. It is an abstraction, which can be used no matter which model (such as OpenAI) we have. Instead, it is possible to use a class for a specific model, where we can provide more options specific to that particular model. This gives us more parameters to work with and greater flexibility, but it ties our implementation to one model. Changing the model later would mean updating the code and migrating to options specific to the new model. This means more work, and not all options may be supported by the new AI platform. You need to decide whether you prefer more options or would like to rather abstract from individual models.
Here is an example with OpenAI-specific options:
OpenAiImageOptions openAiImageOptions = OpenAiImageOptions.builder()
  .withQuality("hd") // This is not supported by regular ImageOptions
  .withN(1)
  .withHeight(1024)
  .withWidth(1024)
  .build();
Obtaining generated images
Our new image service uses ImageClient provided by Spring AI and returns response of type ImageResponse. This response contains not only the image generated, but also various metadata and can contain multiple images if we ask for them via withN in ImageOptions. In fact, the response does not contain the images directly, but also the URL where the generated images are located.
We can create a new method in our controller, which will generate our image based on user-provided prompt. It will then redirect to the URL of the generated image, so it will be displayed directly in the browser.
@RestController
public class AiController {

  private final ChatService chatService;
  private final ImageService imageService;

  public AiController(ChatService chatService, ImageService imageService) {
      this.chatService = chatService;
      this.imageService = imageService;
  }

  @GetMapping("generate-image")
  public void generateImage(@RequestParam("prompt") String prompt,
                            HttpServletResponse response) throws IOException {
      ImageResponse imageResponse = imageService.generateImage(prompt);

      // Get URL of the generated image
      String imageUrl = imageResponse.getResult().getOutput().getUrl();

      // Send redirect to the image URL
      response.sendRedirect(imageUrl);
  }

}
AI Provider abstraction
Even though this article used OpenAI, the functionality of our application is not tightly coupled to it. We could easily switch later to a different provider just by changing our Maven dependency. This way, the impact of changing AI providers is minimized - we don't need to rewrite half of our application, risking breaking existing functionality and introducing bugs. Spring already follows this approach with many of its abstractions. When using Spring caching, you are not tied to a specific cache and can easily switch caching providers without affecting much of your code.
Note that classes, which we used such as ChatClient or ImageClient are not OpenAI specific and will continue to work even after replacing OpenAI with different provider. There are some exceptions such as when providing image generation options. You can either use generic options with less functionality or OpenAI-specific options. In these cases, you need to decide if you need extra functionality given by a specific AI provider or if you are good with generic functionality. In case the generic functionality is enough, it will make migrating to different AI provider easier as no changes will be needed.
Conclusion
In this article we covered basic functionality for Spring AI using OpenAI for both image and text generation. Spring AI offers more functionality, which is beyond the scope of this article, but you can check official documentation for more details. Keep in mind that we used pre-production version of Spring AI and some features are likely to be changed, removed or added. You should not use this version for your real production applications until the final version is released.
